how to draw thread in autocad 3d pdf
AutoCAD 2022 and AutoCAD LT 2022 Bible
The most comprehensive AutoCAD book around!

Tutorial: Draw a 3D threaded bolt
A common, merely hard task, is to create a threaded commodities. I recently got a asking for more 3D tutorials, so hither y'all go. This tutorial assumes an intermediate knowledge of AutoCAD.
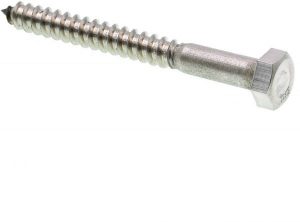
I rummaged around a box of miscellaneous junk and constitute this commodities. It's about iii inches long.
Follow these steps:
-
- Start a new drawing using acad3d.dwt equally the template. Set the visual style to 3D Wireframe and the workspace to 3D Modeling.
- Type plan to run into the view from the summit.
- Create a new layer, object, and make it blue.
- Start the POLYLINE command, specify a starting time betoken anywhere in the center of the screen, and depict segments as follows:
- 3<180
- three/16<90
- .v<0
- 1/4,-ane/xvi (this will exist a diagonal line whose delta X = 1/iv and delta Y = 1/16
- 2<0
- Close
Note: Shut the polyline ensures that you'll get a solid rather than a surface when you circumduct. You'll demand the solid for later operations, such equally UNION.

- Beginning the REVOLVE control and select the polyline. Circumduct it along the 3-unit of measurement line, for the default 360 degrees.
- To get a fuller look, set the ISOLINES system variable to eight and apply the REGEN control.

-
- But to run into the issue, switch to the SW isometric viewpoint.
- Then, switch to the Left viewpoint. You should be viewing the bolt from the top.
- Outset the UCS control and employ the View choice to create a new UCS. If yous want, relieve it.
- Return to the SW Isometric viewpoint once more. You're still in the new UCS. This will help you create the bolt's caput.
- Start the CYLINDER command. The center should be the eye of the revolved solid'due south meridian. Use the Diameter option and set up it to 9/16. The elevation is 0.25.
- Create a polygon of 6 sides. The heart is the bottom heart of the cylinder, utilise the Delimit Almost Circle option. The radius = 9/32.
- Employ the EXTRUDE command to extrude the hexagon to the elevation of the cylinder.
- To create the beveled top, depict a circle at the top of the cylinder, with the same 9/32 radius.
- Extrude it, using the Taper Angle option. The taper bending = -45 degrees, the altitude is -0.five, to extrude information technology downward.
- Use the INTERSECT command and choose the extruded, tapered circle and the extruded hexagon, and you should see the familiar await of the caput of a bolt. Here you see it in the Conceptual visual style.

-
- To create the threads, start the HELIX command. The center is the center of the circle at the superlative of the thread surface area. The base radius is whatever quadrant of the aforementioned circumvolve. Press Enter to prepare the top radius to the same every bit the base radius. Employ the Turns selection and set the turns to 14. For the centrality endpoint, pick the centre at the bottom of the rod, earlier it tapers to a point.
- Switch to the Globe UCS and utilise the Programme command. Turn the viewpoint and so that the end of the helix is at the top or bottom. Below, you see it at the bottom. Use the UCS command with the View option.
- To create the triangular shape of the thread, start the POLYGON command and set up it to 3 sides. Set the center to the endpoint at the terminate of the rod. Use the Inscribed in Circle option. Set the radius to 1/16. If the endpoint of the heliix is at the bottom, as you see hither, you lot need to rotate the triangle 180 degrees. Information technology should look like the figure here. The point of the triangle needs to be facing outward from the rod of the bolt.

-
- Outset the SWEEP command and select the triangle. Use the Alignment option and set up information technology to No. And so select the helix every bit the sweep path.
- Use the UNION command to combine all the objects. Here'due south the issue in the 3D Hidden visual style.

Hither's the issue with the Framing Steel material. I expected information technology to be silver just it came out coppery. It looked so good that I left it.

For an excellent set of 3D tutorials, go to JD Mather'southward site.
Related tips:
* Tutorial: Describe a 3D threaded bolt-video tutorial (See a video of this tutorial!)
* 3D Tutorial: Describe a glass
* Cleave a solid with a surface
Depict and edit faster and easier with these peak 25 productivity tips every AutoCAD user should know. Check out "Meridian Productivity Tips Every AutoCAD User Should Know" at http://world wide web.ellenhelps.me/25-Productivity-Tips
- Author
- Recent Posts

Ellen Finkelstein is the author of the best-selling AutoCAD & AutoCAD LT Bible, which started with R14. Ellen has written extensively on AutoCAD, including articles for Autodesk's website and features for AutoCAD'southward Help system. Ellen's first book was AutoCAD For Dummies Quick Reference.
38 comments to Tutorial: Draw a 3D threaded bolt
Describe faster and easier!
Top 25 Productivity Tips Every AutoCAD® User Should Know

robinsonsentort1955.blogspot.com
Source: https://allaboutcad.com/tutorial-draw-a-3d-threaded-bolt/
0 Response to "how to draw thread in autocad 3d pdf"
Post a Comment